
Full Mouth Dental Implants in Virginia Beach: What to Check Before You Choose a Specialist
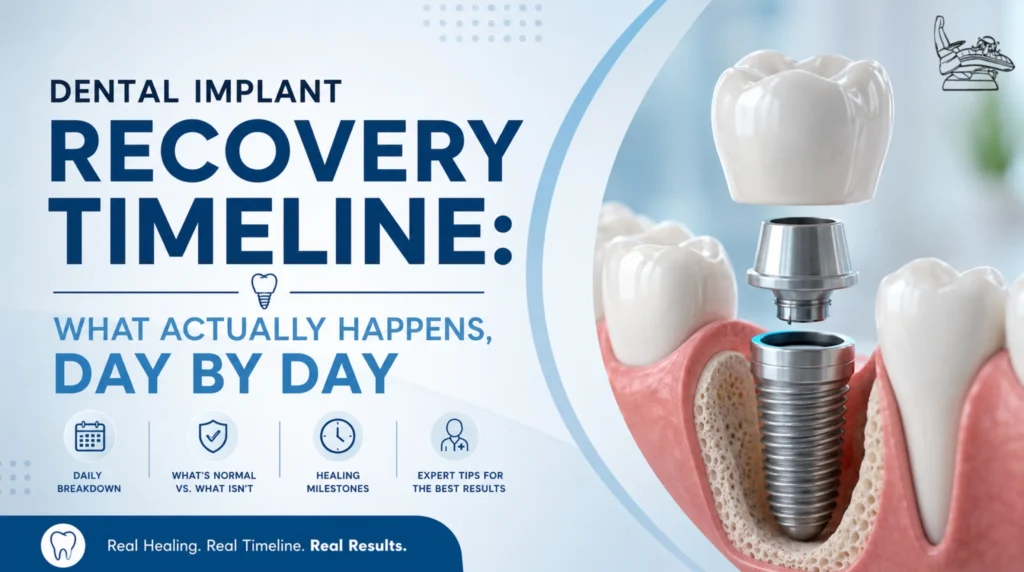
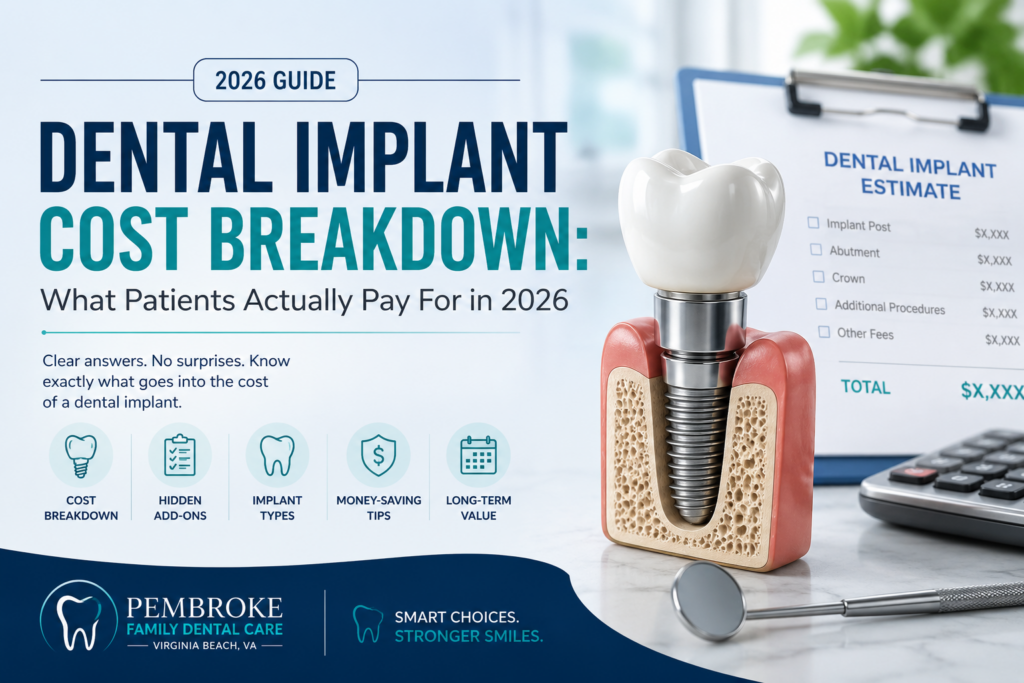
Losing most or all of your teeth doesn’t just change your smile. It changes how you eat, how you talk, and how often you actually smile in the first place. Full mouth dental implants are one of the few options that restore all three — not just paper over the gap. If you’re at the point of researching this seriously, here’s what this guide covers: What full mouth dental implants actually are, and how they differ from a full denture What they cost, and where to find our full itemized breakdown Same-day implants — what the term means and who actually qualifies Screwless (cement-retained) implants, explained plainly Five things worth checking before you pick a specialist Why Virginia Beach patients have been coming to Dr. Cary Savage for over three decades What Are Full Mouth Dental Implants? Full mouth dental implants replace an entire arch — or both — using a small number of titanium posts anchored directly into the jawbone, topped with a fixed prosthetic. Instead of one implant per missing tooth, a full-arch case typically uses four to six implants per arch to support the whole row. You’ll sometimes see this called All-on-4 or All-on-6, depending on the count. The prosthetic doesn’t sit on your gums the way a denture does, and it doesn’t move when you eat. It’s anchored to bone, the same way your natural roots were — which is also why implants stop the jaw from shrinking the way it does under years of denture wear. How Much Do Full Mouth Dental Implants Cost? Short version: full mouth implants — both arches — typically run $60,000 to $90,000+, depending on how many implants are placed and which prosthetic you choose. A single arch with All-on-4 usually lands between $15,000 and $30,000. That range is wide because the number that actually matters is the one built around your mouth, not a website average. We’ve broken down exactly what’s included in that figure — implant posts, abutments, prosthetics, bone grafts, sedation, all of it — in our full cost breakdown. Read it before your consultation. It’ll tell you which questions to ask when you’re comparing quotes. Same-Day Dental Implants: What They Actually Require “Same-day implants” means placing the implant post and a temporary fixed prosthetic in one visit, instead of waiting months between surgery and a temporary crown. It’s a real option for some patients — but it depends on bone density and the condition of the site, not on preference. Patients who qualify usually have enough existing bone volume for immediate stability and no active infection at the site. Patients who need a bone graft first, or who’ve lost significant bone, generally aren’t candidates for same-day loading — a graft needs months to integrate before it can support anything. The honest answer is that same-day placement fits some full-mouth cases and not others. An exam and imaging are the only way to know which one you are. Ask about it directly at your consultation. Screwless (Cement-Retained) Dental Implants “Screwless” implants are more accurately called cement-retained implants. Instead of a screw holding the crown to the implant post — which leaves a small access hole in the biting surface — the crown is cemented onto the abutment, the same way a regular crown cements onto a natural tooth. The upside is cosmetic: no visible screw hole, which matters most on front teeth. The trade-off is repairability. A cemented crown is harder to remove later if something needs adjusting, compared to a screw-retained one that simply unscrews. Neither option wins outright — it depends on where the implant sits and how you weigh long-term maintenance against appearance. Bring it up at your consultation rather than assuming one is automatically better. 5 Things to Check Before Choosing a Full Mouth Implant Specialist 1. Experience with full-arch cases specifically, not just single teeth. Placing one implant and planning a full-arch reconstruction are different skill sets. Ask how many full-mouth cases the dentist has actually done, not just how long they’ve practiced generally. Dr. Savage has been placing implants for Virginia Beach patients for over 33 years. 2. Where they trained, and what that training covered. Credentials aren’t everything, but they’re not nothing either. Dr. Savage graduated from Virginia Tech, attended Georgetown University Dental School, and served as a Dental Corps Officer in the U.S. Navy before returning to Virginia Beach to practice. 3. A written, itemized cost breakdown before you commit to anything. If a quote doesn’t separate implant posts, abutments, prosthetics, imaging, and any bone grafting into individual line items, you can’t actually compare it to another practice’s number. Ask for the breakdown in writing. 4. Honesty about whether you’re a candidate — including when the answer is no. A specialist who’s willing to tell you that you need a bone graft first, or that you’re not a candidate yet, is more useful long-term than one who says yes to everything. 5. A track record you can actually verify. Look for reviews that mention specific outcomes, not just “great experience.” Pembroke Family Dental Care has over 100 five-star reviews from Virginia Beach patients on Google. Why Virginia Beach Patients Choose Dr. Cary Savage Dr. Cary Savage has run Pembroke Family Dental Care for over 33 years. He’s not a high-volume implant chain — he’s a dentist who knows his patients’ history and will tell you honestly whether full mouth implants are the right call for your situation, rather than pushing treatment you don’t need. The practice accepts most private insurance plans and offers CareCredit financing, so cost doesn’t have to be a wall between you and a decision. And if dental anxiety is part of why you’ve put this off, it’s worth knowing the practice’s own tagline is “We Cater to Cowards” — patient comfort isn’t an afterthought here. Frequently Asked Questions How long does full mouth dental implant treatment take? Most full-arch cases run four to eight months from consultation to final prosthetic. Surgery itself typically takes